
PyGTK CD Ripper Tutorial - Part 3
Part 1 of this pygtk tutorial stopped with a working toolbar and two place
holders. Part 2 of this tutorial extended this minimal UI with a list of
songs which was created using GTK ListView. However, this ListView was populated
with a boolean value (True\False) instead of a real Check Button. Additionally,
the ListView was populated using a very dumb way, hard coding the values in
the table. The next part of the tutorial will show how to gain better control
on ListView.
gtk.ListView tamed and controlled
Earlier, the TreeView table was populated with columns containing a text widget.
Each of the columns in the method create_columns was created with:
rendererText = gtk.CellRendererText()
column = gtk.TreeViewColumn("Rip", rendererText, text=0)
The method gtk.TreeViewColumn takes two arguments:
`treeviewcolumn = gtk.TreeViewColumn(title, cellrenderer)`
and cellrender can be on of the 7 CellRederer widgets:
CellRendererText
CellRendererToggle
CellRendererPixbuf
CellRendererCombo
CellRendererProgress
CellRendererSpinner
CellRendererSpin
CellRendererAccel
For the purpose of creating a check button to signal that it is desired to rip a
a track from the CD, a CellRendererToggle is required. Hence, the first lines
of the method create_columns responsible to create the first column will now be
modified to the following:
    # first, cell is created properly as CellRendererToggle widget
    cell = gtk.CellRendererToggle()
    # much like before, only this time cell is no longer CellRendererText
    column = gtk.TreeViewColumn("Rip",cell,active=0)
    column.set_sort_column_id(0)
    treeView.append_column(column)
    # finally, the cell widget is connected to a callback method that
    # does something if toggled.
    cell.connect("toggled", self.on_toggle, self.liststore)
Connecting to a callback function on predefined event is a common operation when
writing UIs, and it was already show in part 1 of this tutorial. The method
on_toggle is quite simple all it does is to set the widget to False if it is True
and vice versa. Despite the straight forward task, it uses some not yet familiar
methods:
def on_toggle(self, cell, path, list_store):
    """
    a click event on the check button should negate
    the content of the button.
    """
    if path is not None:
        iterator = list_store.get_iter(path)
        list_store[iterator][0] = not list_store[iterator][0]
When a mouse click is detected on any of the CellRendererToggle widgets, the
method self.on_toggle is called with the following parameters:
- cell - a pointer to the cell widget, e.g.
<gtk.CellRendererToggle object at 0x7f3a53147fa0 (GtkCellRendererToggle at 0x1f2f580)> - path - the row number in the
TreeViewwidget, e.g.0. - list_store - the
ListStorewidget.
You should insert some print statements inside on_toggle to see this parameters.
The address 0x1f2f580 is the memory address at the moment of calling the program,
it is not expected to be fixed. Same as the row index, it depends on the CellRendererToggle
that was clicked.
The method list_store.get_iter(path) returns a pointer to a GtkTreeIter
instance, e.g. <GtkTreeIter at 0x12c4580>. This iterator instance allows changing
the contents of a row:
list_store[iterator][0] = not list_store[iterator][0]
It is possible of course to print all the items of a row:
        for item in list_store[iterator]:
                print item
which will output as expected:
True
5
bar
baz
zap
Hence, a list_store, can be accessed like a Table with Row,Column coordinates. This allows some fun stuff like the following code:
access the table values as a coordinate system (like in gtk.Table)
self.liststore[2][0] = False

# or you can use the iterators approach
path = self.liststore.get_path(tree_iter)
self.ls_iter = self.liststore.get_iter_first()
# liststore.set_value(iter, column, value)
self.liststore.set_value(self.ls_iter, 3, "First Track")
second = self.liststore.iter_next(self.ls_iter)
third = self.liststore.iter_next(second)
self.liststore.set_value(third, 2, "Famous Singer")
When put together with the whole UI Class, the code will result in:
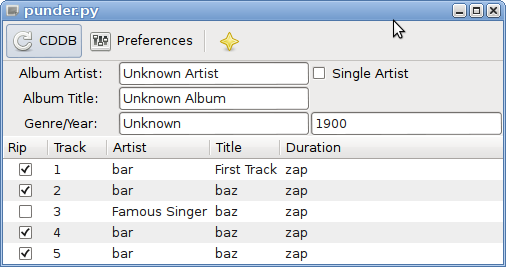
This UI is generated by the better_treeview_control tag.
The interface is almost complete, but it has some funny quirks and the buttons
in the toolbar do nothing except the very limited About Dialog.
More functionality will be added in part 4 of this pygtk tutorial.
Share this post: